
Azure AD Business to Consumer is a very flexible and powerful identity platform. It allows you to completely control the user experience for your customer and partner facing applications. See About Azure AD B2C for more info.
Over the last year and a half or so we have implemented Azure AD B2C for a number of customers. Over the next couple of days / weeks I will be posting a number of blogs with some of the tips and tricks we learned along the way. I will also be sharing some example scripts, policies and Powershell modules we have developed.
In this first post we explain the process of creating a new Azure AD B2C tenant within your existing Azure environment, adding other admins etc. Also see; Setup identity experience framework.
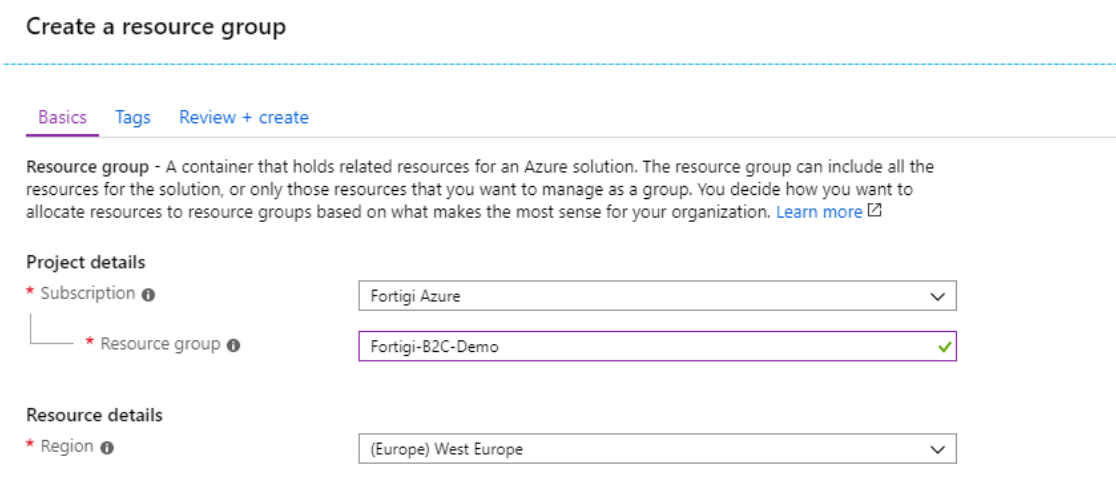
Start by logging in to your Azure Subscription and create a new Resource Group:
Add a new Azure AD B2C tenant, by clicking add new resource and searching for B2C;

After clicking create you will get 2 options;

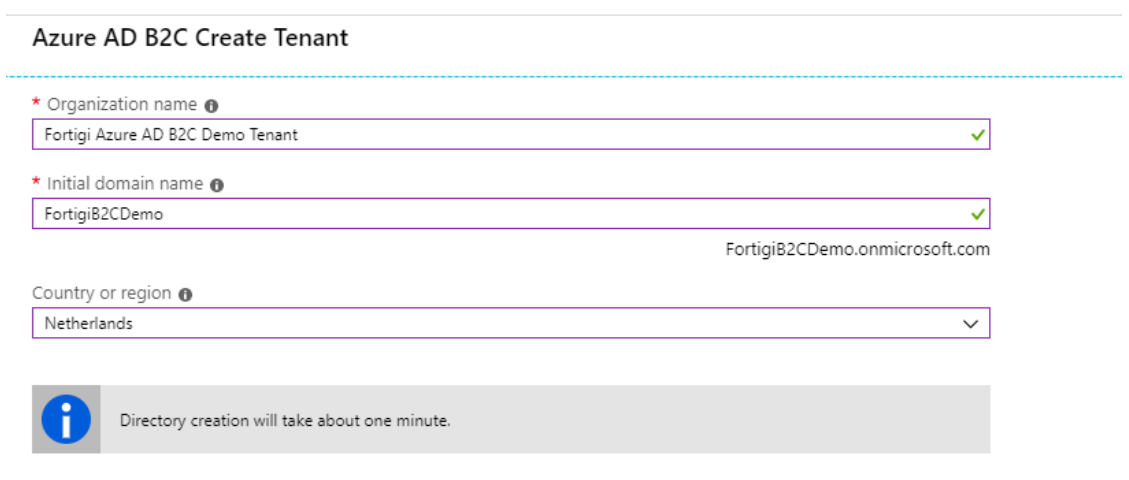
The first step is to create a new Azure AD B2C tenant, after that you can link the tenant to your Azure Subscription so it becomes visible in your resource group. The first step is to create, then we will link. Click Create new Azure AD B2C Tenant;
This will take a minute. When it's done you will get;

You can click here in the message, but we still need to link it to our subscription, so let's do that first. Close the Create new tenant screen, and go back to the Create or link screen. When we click link an existing Azure AD B2C Tenant to my Azure subscription, we get;

It now shows up in the drop down list. After clicking create it will show up in your resource group;

Open the resource and you will see;

Click Azure AD B2C settings and you will be redirected to the Azure AD B2C setting page;

Notice that you are actually directed to a completely new Azure Tenant. This is due to the fact that Azure AD B2C is also a directory, which now only contains a single user. The user you used to create the tenant;

Also when we look for "our other Azure resources" there is nothing there;
To switch back to your default Azure Tenant, use the directory selector in the top:

I have access to a rather large number of B2C tenants so I will see a lot of them. But you will most probably only see 2. The new B2C tenant and your original Azure tenant;

You have now created an Azure AD B2C tenant that you can start to use. You can create new Azure AD B2C users or invite your colleagues (which live in the "normal" Azure AD) by going to users, and selecting "new guest user". They will receive an invite link. All this works very similar to how the normal Azure AD works. Adding at least one other colleague would be my recommendation.This will prevent you from not being able to access the directory when your credentials are accidentally lost.

Also note, that if you are adding a colleague that doesn't have an e-mail address to match his account name, for example if you are inviting a non-personal or service account the invitation e-mail will not reach the user. To work around this issue, open the user you just invited and click the resend invitation button; once you click it.. it will allow you to copy the invitation URL… open this URL while logged in as the account you want to give access.. And your invitation will be redeemed. Basically creating a "foreign security principal" in the B2C directory.

Special thanks to my colleague Taeke Kooiker for his reviews and help with this article.