
Azure AD Business to Consumer is a very flexible and powerful identity platform. It allows you to completely control the user experience for your customer and partner facing applications. See About Azure AD B2C for more info.
Over the last year and a half or so we have implemented Azure AD B2C for a number of customers. Over the next couple of days / weeks I will be posting a number of blogs with some of the tips and tricks we learned along the way. I will also be sharing some example scripts, policies and Powershell modules we have developed.
This blog is part of a series on setting up Azure AD B2C Automated deployments. Also see; Creating a new Azure AD B2C tenant and Setup Identity Experience Framework.
Did you know of the existence of the PowerShell Gallery? I find it really handy. After you create a PowerShell module you can upload it there and then when you get to a new computer all you need to do is run "Install-Module <your module name>" and it will automatically find and download it. This is what we have done with our AADB2C PowerShell module. You can install it by just running; Install-module AADB2C.
We also published the source code with some documentation on Github. So if you have any comments, update requests or anything else please let us know there. The source code for the Azure AD B2C PowerShell module can be found here. This module will work in both PowerShell 5.0 as well as PowerShell 6.0 and will therefor work on both Windows, Mac and Linux. No additional modules are required. This module utilizes the Azure AD B2C REST API to manage B2C policies from the PowerShell command line or Azure DevOps. See here for the API specification.
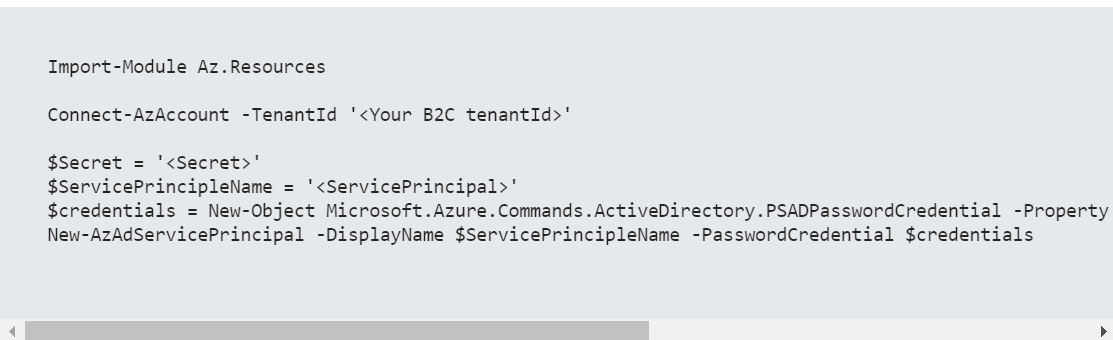
This module requires you to authenticate using a ServicePrincipal, Secret and TenantID. To create a Service Principal using the Az module run the following commands;
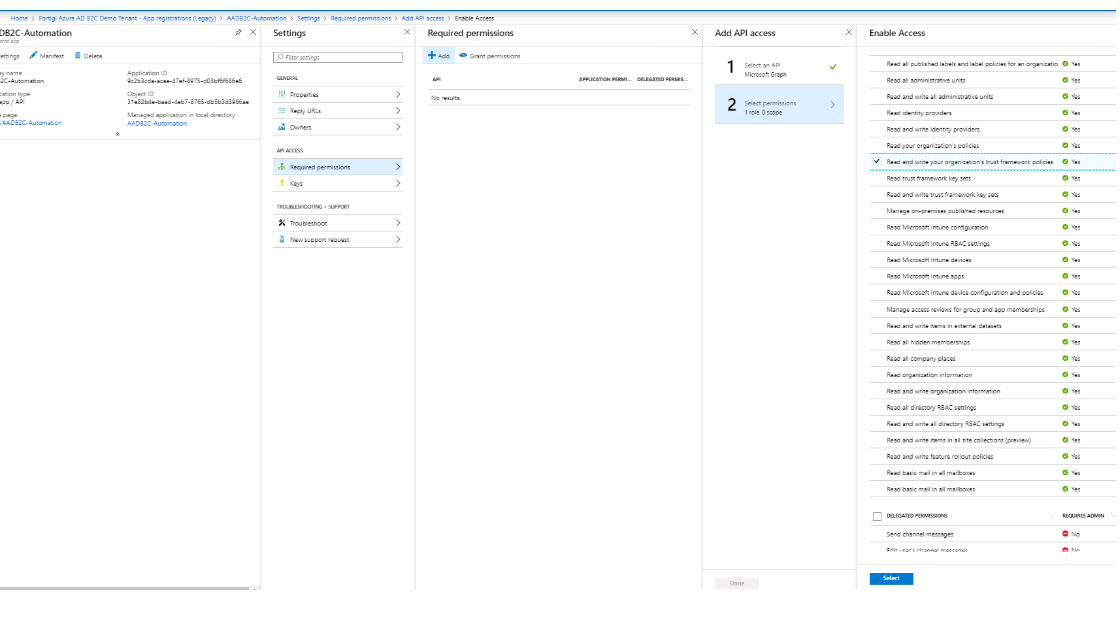
After this you will need to authorize your Service Principal to "Read and write your organization's trust framework policies".
To do that open the regular Azure AD Portal;
Open App registraitons (Legacy)
Select all apps, and find the app (or service principal) that you just created.
Go to settings, click required permissions click Add
Select and API and select Microsoft Graph
Select permission and select "Read and write your organization's trust framework policies"
Click add and click grant permissions
You can do something like this;

The ClientID = The applicationID of the service principal that you just created. It reads your XML based IEF policies and then uploads them one by one.
Finally, before we move on to the next blog post. Add the applicationID of the JSON file that we have been using in the other blog posts;
